• Skip to primary navigation
  • Skip to main content
  • Skip to primary sidebar
  • Skip to footer

DIY Craft Photography

  • Home
  • Take Better Photos
    • Lighting
    • Photo Styling
    • Photoshop Tutorials
  • Upgrade your Gear
    • DSLR Cameras
    • Point and Shoot Cameras
    • Photo Studio Kits
  • Business & Marketing
    • Etsy
You are here: Home / Post Processing / Photoshop Tutorials / Photoshop Tutorial: Fake a Background Blur

Photoshop Tutorial: Fake a Background Blur

August 28, 2013 by M. Johnson

One major drawback of digital photography (and point and shoot cameras in general) is that everything is in focus!  But what if you’d like parts of your photos (such as the backgrounds) to be blurry and out of focus?

In this tutorial, we’ll show you how to use Photoshop to fake a background blur.  The blurry background (and sometimes foreground) effect is called “shallow depth of field”, just to give you some terms to search for if you’d like to read more!

Difficulty Level: Complete Beginner
This tutorial was created using Photoshop CS5, but most image editing software packages have similar features!  

Before You Begin

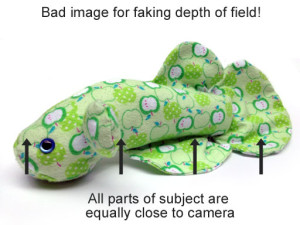
First, ask yourself: will your blur make sense?

Remember that you’re trying to create the illusion that some elements of your photo are blurry because they’re too far or too close to be in focus.  If everything in your image is equally close to the camera lens, that blur effect will seem out of place.  Here are two images that illustrate the concept:

fake a background blur does it make sense


fake a background blur on images with depth


Photoshop’s Blur Brush

The Blur Tool is a great way to control how much blur gets applied and where.  In Photoshop, find the Blur Tool in your tool palette.

Not using Photoshop?  Most other image editors have this brush, including Pixlr Advanced (our favorite free online photo editor).

fake a background blur with photoshop's blur tool

Set the Blur Tool’s strength to 50% so you can “layer” the strength of its effect.  Resize the brush as needed for your image.

fake a background blur with photoshop's blur tool

Left-click and drag your blur tool over the area you want to blur.  Left click again to re-apply the blur.  Layering is best – apply more layers of blur on the furthest-away parts of the image, and less blur on the closer elements.  Leave the foreground completely untouched so that it remains sharp.

fake a background blur with the blur tool in Photoshop

The finished result:

photoshop fake background blur before and after

Another example made using this technique (look on the left and right sides of the blanket roll):

before and after photoshop fake background blur

More Photoshop Blur Techniques

There’s more than one way to blur a photo!  Here are two more Photoshop blur tutorials from around the web.

  • Blurring the background in Photoshop using just a feathered selection and the gaussian blur filter – fantastic result!
  • Gizmodo’s 1-minute long video demonstrating Photoshop CS6’s new shallow depth of field filter.
Filed Under: Photoshop Tutorials, Post Processing Tagged With: blur, photoshop, tutorial

Previous Post: « Beyond the Pale: 6 Alternatives to White Backgrounds
Next Post: The Magic of Bounce Lighting »

Reader Interactions

Trackbacks

  1. Ultimate Product Photography Tips List 2013 - DIY Craft Photography says:
    September 5, 2013 at 1:10 am

    […] Photoshop Tutorial: Fake a Background Blur […]

Primary Sidebar

Latest from DIYCraftPhotography

  • 10 Easy Ideas to Dress Up your Food Photography
  • 5 of the Best Selling Wood Crafts on Etsy (Plus a Tour of Successful Woodworking Shops!)
  • 5 *More* Lessons from the Top 5 Etsy Shops
  • Samsung NX300 Camera Review and Sample Photos with Kit Lens
  • Holiday 2014 Camera & Equipment Buyer’s Guide for Craft Photographers, eBay Sellers, and Bloggers
  • 13 Product Photography Lessons from My Fake Etsy Photo Shoot
  • Ultimate Craft Business Tips and Resource List
  • Etsy Listings: The Magic Number for More Traffic – Etsy Case Study: Part 4
  • How to Use Etsy Tags: 13 chances to woo a buyer – Etsy Case Study: Part 3
  • Get Discovered with Search Friendly Etsy Listing Titles – Etsy Case Study: Part 2
  • Naming and Opening Your Etsy Shop – Etsy Case Study: Part 1
  • Simple White Background Product Photography Setup
  • Best Indoor Lighting Equipment for Craft Photographers
  • How to Get Great Photos with your Point and Shoot Camera
  • Best Cameras for Craft and Food Photography (and every budget!)

{Categories}

  • Business & Marketing (11)
    • Etsy (10)
  • Cameras & Equipment (15)
    • DIY Setups (1)
    • DSLR Cameras (3)
    • Lighting Equipment (1)
    • Mirrorless Cameras (1)
    • Photo Studio Kits (2)
    • Point and Shoot Cameras (2)
  • Checklists (1)
  • Composition & Techniques (9)
    • Lighting (3)
  • My Equipment (1)
  • Odds and Ends (1)
  • Photo Inspiration (2)
  • Photo Styling (4)
  • Post Processing (5)
    • Photoshop Alternatives (1)
    • Photoshop Tutorials (4)
  • Reviews (1)

Welcome!

Stand out in the growing online market for handmade goodies with better photographs! DIYCraftPhotography skips the jargon and complicated equipment and offers simple, effective techniques for lighting, composition, and post processing. Make your handmade crafts shine online! -Mandi Read more about me...

Footer

DIYCraftPhotography is a participant in the Amazon Services LLC Associates Program, an affiliate advertising program designed to provide a means for sites to earn advertising fees by advertising and linking to amazon.com. We always encourage you to shop around for the best deal. You can read our full disclosure here.

About
Privacy

© DIYCraftPhotography 2014-2024 | All Rights Reserved | All content is the legal property of M. Johnson unless otherwise credited. Thank you for visiting! ♥


Copyright © 2024 DIY Craft Photography on the Foodie Pro Theme

Notifications